
Discover the secret of beer cookies, a simple yet incredibly tasty treat that has delighted palates for generations. Crispy, slightly sweetened, and with an irresistible buttery touch, this beer cookie is perfect to accompany your breakfast, afternoon tea, or even as a quick and delicious snack anytime during the day. Get ready to be surprised by the ease of this recipe and the authentic flavor it offers. With simple ingredients and easy steps, you can enjoy beer cookies fresh and crispy whenever you wish.
The Homemade Charm of Beer Cookies: Tradition and Simplicity in Every Bite
O beer cookie carries the nostalgia of grandma’s recipes, the kind found in yellowed notebooks that take us back to simpler and more flavorful times. This recipe is a true treasure of home cooking, passed down from generation to generation, and continues to be loved for its simplicity and unmatched taste. The crispiness that melts in your mouth, the buttery aroma that fills the kitchen, and the subtle sweet touch make the beer cookie a perfect companion for the coziest moments of the day.
Besides being delicious, the beer cookie is incredibly versatile. Its crunchy texture and gently sweet flavor pair perfectly with various drinks, from classic coffee or tea to a glass of cold milk or even a refreshing juice. They’re also great to enjoy on their own, as a quick snack between meals. Whether for a special afternoon treat, hosting friends at home, or just having a crunchy delight at hand, the beer cookie is always an excellent choice.
Why is Beer the Secret Ingredient for the Cookie’s Crunchiness?
The ingredient that transforms an ordinary cookie into a beer cookie crispy and airy delight is, of course, beer. But what is the secret behind this unusual combination? The answer lies in the science of fermentation and the magic of alcohol. Just like cachaça in traditional cachaça donuts, the alcohol present in beer, along with its fermentation, plays a fundamental role in the final texture of the beer cookie.
During dough preparation and baking, the beer’s alcohol evaporates, helping the cookie become lighter, airy inside, and incredibly crispy outside. Beer also aids in gluten development from the wheat flour, contributing to the cookie’s structure without making it heavy or dense. And don’t worry about flavor or alcohol! The alcohol fully evaporates during baking, making the beer cookie safe for everyone, including children. The beer flavor is almost imperceptible, giving only a subtle tang that enhances the overall cookie taste.
Simple Ingredients for an Amazing Beer Cookie: Grandma’s Basic Recipe Essentials Revealed
The beauty of the beer cookie lies in its incredibly simple and accessible ingredient list. You probably already have most of them in your pantry! Each ingredient plays a crucial role in the cookie’s final texture, flavor, and crunchiness. Let’s explore each in detail:
Wheat Flour: The Structural Base of the Crunchy Cookie
Wheat flour is the backbone of the beer cookie, providing the necessary structure so it keeps its shape and crispiness. We use all-purpose wheat flour, type 65, without leavening, perfect for cookies and biscuits because it has a moderate gluten content. Gluten is the protein responsible for dough elasticity and, in the right amount, ensures the beer cookie is crispy rather than hard or rubbery.
Tips about Flour:
- Type of Flour: Choose all-purpose wheat flour without leavening. Flours with built-in leavening can alter the cookie’s texture.
- Flour Quantity: Flour amount may vary slightly depending on air humidity and brand. Follow the recipe as a base and adjust gradually, adding a little more flour if the dough is too sticky or more beer if too dry. The ideal dough is soft but not sticky to the hands.
- Whole Wheat Flour (Variation): For a more rustic version with more fiber, you can substitute part of the white wheat flour with whole wheat flour. Start by replacing 1/4 of the white flour with whole wheat and adjust the liquid (beer) as necessary, as whole wheat flour absorbs more liquid.
Salt: Enhancing Flavors and Balancing Sweetness
Salt, often underestimated in sweet recipes, is an essential ingredient in the beer cookie. It not only balances the sweetness of the sugar but also enhances all other flavors, including butter and the subtle hint from beer. A pinch of salt makes all the difference, turning a good cookie into a memorable one.
Tips about Salt:
- Type of Salt: We use common table salt (refined salt) for this recipe. If preferred, you can use fine sea salt. Avoid coarse salt unless finely ground, so the dough texture isn’t compromised.
- Salt Quantity: The salt quantity is small but crucial. Do not omit or increase it except a minimal adjustment to your taste. The goal is to enhance flavors, not to make the cookie salty.
Refined Sugar: Delicate Sweetness and Pleasant Texture
Refined sugar provides the soft and delicate sweetness that characterizes the beer cookie. We use common refined sugar, also known as white sugar, which dissolves easily in the dough and gives a nice texture without making it overly sweet. The aim is a balanced cookie where sweetness complements the crunch and buttery taste.
Tips about Refined Sugar:
- Type of Sugar: Common refined sugar is best for this recipe. Other sugars like brown sugar or demerara may change the cookie’s color, flavor, and texture, making it less crispy and more molasses-flavored.
- Reducing Sugar (Variation): If you prefer a less sweet cookie, you can slightly reduce the refined sugar amount, decreasing by up to 1/4 cup. Remember sugar also contributes to the cookie’s crispness, so large reductions may affect the final texture.
Cold Butter: The Buttery Essence and Perfect Crunch
Cold butter is the secret to a beer cookie truly buttery and irresistibly crispy cookie. Butter incorporated cold into the dough and baked in a hot oven creates layers of fat that melt during baking, resulting in a light, airy cookie with a crunch that melts in your mouth. Butter quality directly influences the cookie’s flavor, so use good quality butter with at least 80% fat.
Tips about Cold Butter:
- Real Cold Butter: It is essential that the butter is well chilled before incorporating it into the dough. Cut butter into cubes and refrigerate for at least 15-20 minutes before starting. In hot weather, you can even freeze it for a few minutes before cutting.
- Salted or Unsalted Butter?: Use unsalted butter to control salt in the recipe. If using salted butter, reduce salt added to dough slightly.
- Butter Substitutes (Vegan and Alternative Variations): For a vegan version or lactose intolerant, you can replace butter with 100% vegetable margarine or refined coconut oil. These options provide a similar texture and work well. Common vegetable oil (like canola or sunflower) can also be used but may yield a slightly less buttery and slightly different texture.
Clear Beer Without Foam: The Magical Ingredient for Lightness and Crunch
Clear beer without foam is the star ingredient that turns this cookie into a unique experience. Choose a light beer like Lager, Pilsen, or Pale Lager, which have smooth and light flavors ideal to not overpower other recipe flavors. The beer must be foam-free so measurements are accurate and to prevent excess liquid in the dough.
Tips about Clear Beer Without Foam:
- Light Clear Beer: Choose light, clear beers with low hops and malt so the beer flavor doesn’t dominate the cookie. More bitter or full-bodied beers can alter the cookie’s final flavor.
- Remove the Foam: Before measuring beer, remove excess foam. Let the beer rest a few minutes or stir gently to reduce foam. Correct beer measurement is important for dough consistency.
- Non-Alcoholic Beer (Variation): For an alcohol-free version, you can use non-alcoholic light beer. The result will be very similar to alcoholic beer, keeping cookie’s crispness and lightness.
- Other Carbonated Drinks (Variations): In some older recipes, sparkling water or lemon soda is used instead of beer. These also work and can vary the cookie flavor, though the beer version is the most traditional and flavorful.
Crystal Sugar for Finishing: Shine, Extra Crunch, and Delicate Sweetness
Crystal sugar is the final touch that elevates the beer cookie to a higher level. Rolling raw cookies in crystal sugar before baking creates a crunchy, glossy outer layer that wonderfully contrasts with the soft, light interior. Additionally, crystal sugar adds an extra delicate sweetness complementing the cookie’s overall flavor.
Tips about Crystal Sugar:
- Medium-Grain Crystal Sugar: Opt for medium-grain crystal sugar that sticks well to cookie dough and creates an ideal crunchy layer. Very coarse crystal sugar can be hard to bite, and very fine crystal sugar may dissolve too much during baking.
- Other Sugars to Finish (Variations): If you don’t have crystal sugar, you can use regular granulated sugar to finish, although the crunchy effect will be slightly less. Some recipes use demerara sugar for a more rustic and caramelized touch.
- Spices in Crystal Sugar (Variations): For an extra aromatic touch, you can mix powdered spices into the crystal sugar, such as ground cinnamon, lemon or orange zest, ground cardamom, or powdered ginger. Experiment and discover your favorite combinations!
Easy Preparation of Beer Cookies: Illustrated Step-by-Step Guide for You to Shine
With the ingredients in hand and the tips noted, let’s go through the detailed step-by-step to prepare your beer cookie crispy and irresistible. The recipe is simple, even for kitchen beginners. Follow the instructions carefully and get ready for an amazing result!
Step 1: Preparing the Ingredients and the Beer
- Chilling the Beer and Measuring: Take the beer out of the fridge and pour it into a glass or bowl about 15 minutes before starting the dough preparation. This allows the foam to settle so you can measure the exact amount of beer without foam, as indicated in the recipe (1/3 cup, or 80ml).
- Chilling and Cutting the Butter: Cut the chilled butter into small cubes and place in a container. Put the butter cubes back in the fridge to ensure they stay very cold until used in the dough.
- Preparing the Baking Sheets: Prepare the baking sheets that will be used to bake the cookies. Line the sheets with parchment paper (vegetable paper) or lightly grease with butter and sprinkle flour. Parchment paper helps with easy removal of cookies after baking and prevents sticking to the sheet.
Step 2: Making the Cookie’s Crispy Dough (Butter Crumb Technique)
- Mixing the Dry Ingredients: In a medium or large bowl, place the wheat flour, salt, and refined sugar. Mix the dry ingredients well with a whisk or spoon to ensure they are evenly distributed.
- Incorporating the Cold Butter (Crumb Technique): Add the cold butter cubes to the bowl with the dry ingredients. Using your fingertips (or a pastry blender if you have one), work the butter into the flour by gently massaging and crumbling. The goal is to incorporate the butter into the dry ingredients until you get a coarse and homogeneous crumb, with small pieces of butter still visible. This technique is crucial for cookie crispiness because the butter should not melt completely at this stage.
- Gradually Adding the Beer and Reaching the Dough Consistency: Add the clear beer without foam to the bowl gradually while mixing the ingredients with your hands or a spoon. Mix gently until forming a smooth, soft dough that releases from your hands. Adjust the dough if necessary by adding a little more flour (spoon by spoon) if it is too sticky, or a few drops more beer if it’s too dry and crumbly. The ideal point is a soft but firm dough that does not stick excessively to the hands.
- Forming a Dough Ball and Resting (Optional): Gather the dough into a ball, without over-kneading. Although not essential, you can wrap the dough ball in plastic wrap and refrigerate it to rest for about 10-15 minutes. This resting time in the fridge relaxes the dough’s gluten and can make shaping the cookies easier, besides making them even crunchier.
Step 3: Shaping, Coating in Crystal Sugar, and Refrigerating (The Crunchiness Secret)
- Preparing Crystal Sugar for Coating: Place the crystal sugar on a shallow plate or small bowl. Set aside to use in the coating step for the cookies.
- Shaping the Cookies (Creative and Traditional Shapes): Remove the dough from the fridge (if rested). Divide the dough into small portions, about the size of medium marbles (approximately 10-15 grams each). Shape the cookies into the desired forms. Traditional shapes include:
- Oval Shape (“Little Balloons”): Roll each dough portion between the palms of your hands, forming a small ball. Then slightly elongate the ball, shaping it into an oval shape, like little “balloons”.
- Round Shape (“Little Cookies”): Roll each dough portion between the palms of your hands to form smooth, round balls.
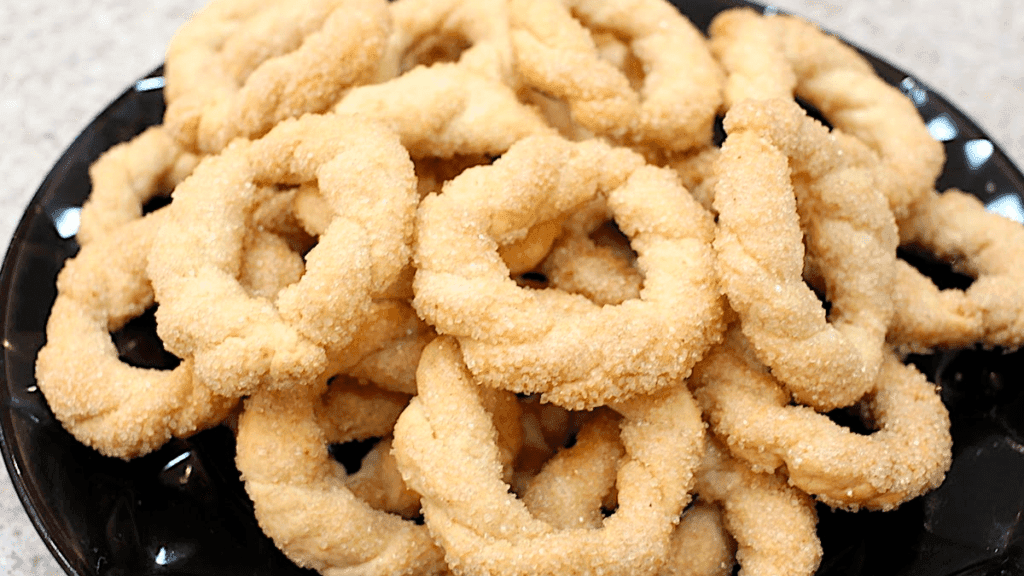
- Ring Shape (“Mini Wreaths”): Shape small dough rolls with your hands. Twist the rolls into a braid shape and join the ends to form small rings.
- Coating in Crystal Sugar: After shaping each cookie, gently roll it in the crystal sugar, ensuring it is completely covered in a uniform layer of sugar.
- Placing on the Baking Sheet and Fork Marking (Classic Touch): Place the sugar-coated cookies on the prepared baking sheet, leaving a small space (about 1 cm) between them, as they don’t rise much when baking. Using a fork, gently press the surface of each cookie, marking the traditional cross or parallel lines. This process slightly flattens the cookie and creates a characteristic texture.
- Refrigerating Before Baking (Trick for Maximum Crunchiness): Place the baking sheet with the raw, shaped cookies in the fridge for about 10-15 minutes while the oven preheats. This quick chilling of the dough before baking is a secret to ensuring even crunchier and lighter cookies. The cold butter in the dough does not melt quickly in the oven, allowing the cookie structure to form properly, resulting in a light and crunchy texture.
Step 4: Baking the Beer Cookies until Golden (Perfect Crunch and Flavor)
- Proper Oven Preheating: Preheat the oven to 180ºC (medium) for at least 15-20 minutes before baking the cookies. A well-preheated oven guarantees even cooking and perfect crunchiness.
- Baking at Ideal Time and Temperature: Remove the baking sheet with the chilled cookies from the fridge and immediately place it in the preheated oven. Bake for about 30-35 minutes, or until the cookies are golden at the edges and slightly yellowed on top. Watch the baking time carefully, as it may vary depending on your oven and cookie size.
- Observing the Color (Ideal Crunchiness Point): The ideal baking point of the beer cookie is when they are golden at the edges and lightly yellow in the center. Do not overbrown the cookies, as they may become too hard when cooled. A lightly golden cookie will have perfect crunchiness without being overly dry.
- Cooling Completely on a Rack (Secret for Long-lasting Crunchiness): Remove the baking sheet from the oven. Immediately, carefully (they will be hot and slightly soft), detach the cookies from the sheet and transfer to a cooling rack. Let the cookies cool completely on the rack for at least 1 hour before serving or storing. It is important they cool fully on the rack to become very crunchy and allow moisture to evaporate completely, ensuring long-lasting crunchiness. The cookies come out of the oven still somewhat soft but become very crunchy as they cool.
Golden Tips and Delicious Variations for Your Irresistible Beer Cookie
Transform your experience with beer cookie with these valuable tips and suggestions for creative variations:
- Flavoring the Dough with Spices: Add powdered spices to the cookie dough for an extra aromatic touch. Ground cinnamon, lemon or orange zest, ground fennel, powdered ginger, or ground cardamom are great options. Mix the spices along with the dry ingredients.
- Savory Beer Cookie with Fine Herbs: For a savory version, omit the refined sugar in the dough and add chopped fine herbs (such as rosemary, thyme, oregano, basil) or grated parmesan cheese. Finish with coarse salt or black sesame instead of crystal sugar. Serve as an appetizer or side for soups and salads.
- Semi-Bitter Chocolate Coating: After the cookies have completely cooled, melt semi-bitter chocolate in a double boiler or microwave and dip half or the base of the cookies into the melted chocolate. Let the chocolate harden at room temperature or in the fridge for an indulgent touch.
- Beer Cookie with Dulce de Leche or Jam: Serve the cookies accompanied by dulce de leche, fruit jam, or cream cheese for dipping to create an even more special snack or dessert.
- Gift Homemade Cookies: O beer cookie is a perfect and affordable gift! Package the cooled cookies in cellophane bags, decorated jars, or tins, tie with a ribbon or twine, and add a handmade tag. A delicious and heartfelt gift!
- Impeccable Storage for Extended Crunchiness: Store the beer cookies once cooled in an airtight container, tightly sealed jar, or tin at room temperature. Stored properly, they will remain crunchy and tasty for up to 1 week or more. Avoid storing the cookies in humid places or exposed to air, as they may lose their crunchiness.
Conclusion: Celebrate the Simplicity and Unmatched Flavor of Homemade Beer Cookies
Congratulations! You now have the knowledge to create the most delicious beer cookies homemade, crispy, and easy-to-make cookies. With accessible ingredients, a straightforward step-by-step guide, and the valuable tips we’ve shared, you can enjoy this classic treat anytime you want. Share the delightful aroma and irresistible crunchiness of beer cookies with your family and friends, turning simple moments into tasty memories. Try the recipe, explore creative variations, and fall in love with the charm and authentic flavor of beer cookie made at home. Brew the coffee, invite loved ones, and enjoy this crispy delight!
Leave your comment below, share your experiences and variations of beer cookie and keep exploring the world of homemade flavors that grandma’s kitchen offers us! Enjoy your meal and see you at the next recipe!
Image Source: Isamara