Homemade Maria Mole: A Sweet Cloud with a Taste of Childhood (Easy and Irresistible Recipe)


Who can resist a homemade maria mole? This traditional Brazilian sweet, with its airy texture and delicate coconut flavor, evokes affectionate memories and happy childhood moments. More than just a simple dessert, the homemade maria mole is a gateway to a universe of sweet memories, those that warm the heart and transport us to simpler and tastier times.
The Nostalgia and Unmistakable Flavor of Homemade Maria Mole
A homemade maria mole holds a special place in the emotional imagination of many Brazilians. For some generations, this sweet brings back childhood days, when it was common to find colorful jars full of homemade maria mole in neighborhood shops, waiting to be enjoyed as a reward after a day of play. The soft texture, almost like a cloud, and the irresistible coconut aroma made the homemade maria mole an unforgettable delight.
Even with the passing of years and the emergence of new gastronomic trends, the homemade maria mole retains its charm and popularity. Its simplicity and genuine flavor win over palates of all ages, from the youngest who are just discovering the pleasure of this classic sweet, to the more experienced, who relive childhood memories with every bite. Making homemade maria mole at home is a way to rescue these traditions and share sweet moments with family and friends.
Homemade Maria Mole: More than a Sweet, a Sensory Experience
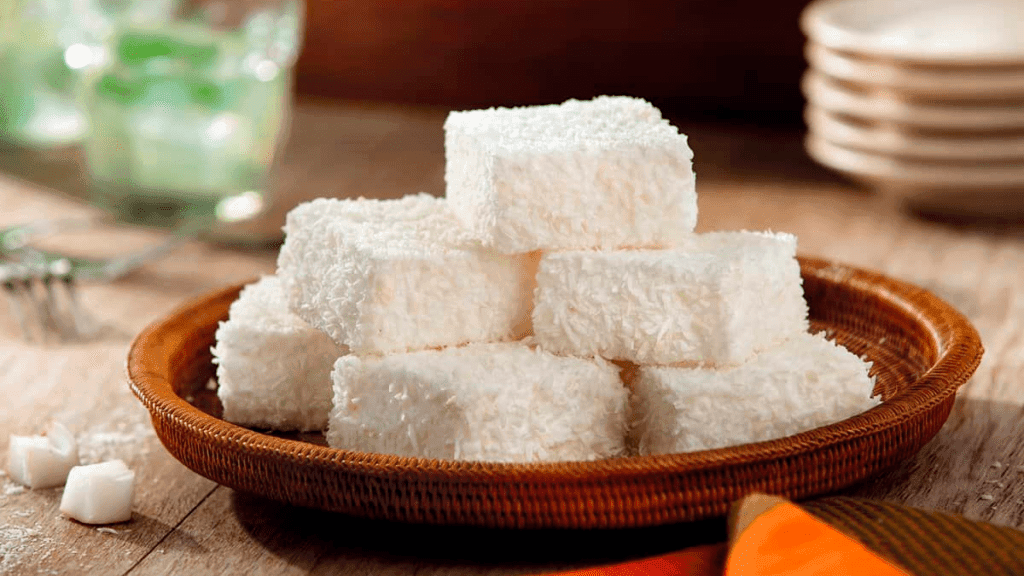
The experience of savoring a homemade maria mole goes beyond taste. It is a delight for all the senses. Starting with the light and airy texture that delicately melts in the mouth, providing a unique and pleasurable sensation. The coconut aroma, present both in the batter and the topping, fills the nose and whets the desire to try more. And the delicate appearance, with its little white mounds sprinkled with coconut, invites an irresistible bite.
Making homemade maria mole at home allows you to experience all these sensations even more intensely. The aroma that spreads through the kitchen during preparation, the anticipation as the sweet sets in the fridge, and the joy of sharing the final result with loved ones turn the simple act of making a sweet into a special and memorable moment.
Simple Ingredients and Secrets for a Perfect Homemade Maria Mole
The beauty of homemade maria mole lies in its simplicity. The recipe uses few ingredients, easy to find in any pantry, but the careful combination and preparation ensure a surprising final result. The secret to a perfect homemade maria mole is to follow the step-by-step instructions carefully and use good quality ingredients.
Essential Ingredients for Your Homemade Maria Mole
The ingredient list for homemade maria mole is concise, but each plays a fundamental role in the texture, flavor, and appearance of the sweet:
- Refined sugar: Responsible for the sweetness and the structure of the base syrup for the meringue. Opt for refined sugar, which dissolves more easily and ensures a smooth and homogeneous syrup.
- Filtered water: Used to prepare the sugar syrup and hydrate the unflavored gelatin. The water quality also influences the final result.
- Egg whites: Key ingredient for the airy and light texture of homemade maria mole. Use fresh and large egg whites to ensure good meringue volume.
- Unflavored, colorless gelatin: Responsible for giving consistency and firmness to homemade maria mole. Use high-quality gelatin and follow the hydration and dissolution instructions correctly.
- Fine grated dried coconut: Gives the characteristic flavor to homemade maria mole, both in the batter and the topping. Use finely grated dried coconut for a more delicate texture. Toasted coconut can also be used to vary the flavor and appearance.
- Vegetable oil (for greasing): Used to grease the baking pan and facilitate removal of the homemade maria mole. Use neutral vegetable oil, such as canola or sunflower oil, so as not to interfere with the sweet’s flavor. Silicone mats are also an excellent alternative to prevent maria mole from sticking.
Syrup Consistency and Perfect Meringue: Pillars of Homemade Maria Mole
The success of homemade maria mole largely depends on the correct preparation of the sugar syrup and the meringue. The syrup needs to reach the “soft ball” stage, fundamental to ensure the soft and airy texture of the sweet. The meringue must be firm and glossy, incorporating the hot syrup gradually and evenly.
Soft Ball Stage of Sugar Syrup: The Secret to Soft Texture
Sugar syrup at the “soft ball” stage is the heart of homemade maria mole. It is this precise point that gives the sweet its soft and light texture. Reaching the correct stage may seem challenging, but with attention and some tips, you will master this technique easily.
- Dissolving the sugar: In a small pan, preferably with a thick bottom, mix the sugar and water. Bring to low heat and stir gently only until the sugar completely dissolves. Avoid excessive stirring after the sugar dissolves to prevent crystallization.
- Boiling and Concentration: Increase heat to medium and let the syrup boil without stirring. Use a brush moistened with water to clean the inner edges of the pan, removing sugar crystals and preventing crystallization.
- Boiling Time: Let the syrup boil for about 7 minutes, or until it reaches the “soft ball” stage. Time may vary slightly depending on heat strength and type of pan.
- Cold Water Glass Test: To check if the syrup has reached the correct stage, use the cold water glass test. Fill a glass with ice-cold water. Take a small portion of syrup with a spoon and pour it into the cold water. Try to form a soft ball with the syrup in the water. If you can form a ball that holds together and remains soft, the syrup is at the “soft ball” stage. If the syrup dissolves in the water or forms a hard ball, continue cooking for a few more minutes and repeat the test.
- Remove from Heat and Use Hot: As soon as the syrup reaches the “soft ball” stage, remove immediately from heat and use it while still hot to prepare the meringue. Cooling syrup may harden and compromise the texture of the homemade maria mole.
Firm and Glossy Meringue: The Airy Base of Maria Mole
The meringue is responsible for the light and airy texture of homemade maria mole. To get a perfect meringue, it is essential to beat the egg whites to the correct stage and incorporate the hot sugar syrup gradually and continuously.
- Egg Whites Whipped to the Correct Stage: In a clean and dry bowl (preferably stainless steel or glass), beat the egg whites with a whisk or mixer at medium speed. Start at low speed and gradually increase. Beat until stiff and glossy peaks form. The correct stage is when the meringue forms firm peaks when the whisk is lifted and does not drip when the bowl is turned upside down (carefully!).
- Gradually Incorporating the Hot Syrup: Once the egg whites are properly whipped, start adding the boiling sugar syrup slowly and continuously while beating the meringue at medium speed. It is essential that the syrup is very hot when added to the meringue.
- Beating Time: Continue beating the meringue with the syrup for about 10 to 15 minutes, or until it cools completely and is very firm and glossy. Time may vary depending on mixer power. The meringue should triple in volume and have a dense, stable consistency.
- Ideal Meringue Stage: The meringue at the ideal stage for homemade maria mole should be firm, glossy, form very stiff peaks, and maintain volume even after cooling completely.
Hydration and Incorporation of Gelatin: Essential Firmness
Unflavored, colorless gelatin is the ingredient that gives firmness to homemade maria mole, allowing it to keep shape and texture after refrigeration. Correct hydration and incorporation of gelatin are crucial to prevent the sweet from becoming rubbery or lumpy.
- Gelatin Hydration: In a small bowl, put the powdered unflavored gelatin and add half the cold water amount indicated in the recipe. Mix gently and let hydrate for about 2 minutes. The gelatin will absorb water and become gelatinous.
- Gelatin Dissolution: Boil the remaining water indicated in the recipe (a small amount). Pour the boiling water over the hydrated gelatin and stir vigorously with a spoon or fork until the gelatin dissolves completely. Make sure no lumps remain.
- Gentle Incorporation into the Meringue: With the meringue already cool and firm, add the dissolved gelatin slowly and gently, mixing carefully with a silicone spatula (dough scraper) or whisk, using upward motions to incorporate the gelatin without losing volume and aeration. Mix only until fully incorporated, avoiding overmixing.
Assembly, Refrigeration, and Finishing of Homemade Maria Mole
The assembly of homemade maria mole is simple and quick. Just shape the meringue with gelatin into mounds or desired shapes on a greased baking sheet or silicone mat and refrigerate for a few hours to firm up. Finishing with grated coconut completes the appearance and irresistible flavor of this classic sweet.
Shaping and Refrigeration: Giving Form to Homemade Maria Mole
- Preparing the Baking Sheet: Choose a medium baking sheet and grease the bottom and sides with a thin layer of vegetable oil or use a silicone mat. Greasing or using a silicone mat makes removal of the homemade maria mole easier after it firms.
- Shaping the Meringue: Transfer the meringue with gelatin to a piping bag fitted with a medium tip (plain or star). If you don’t have a piping bag, use two tablespoons to shape the mounds. Make mounds about 4 to 5 cm in diameter (or larger if desired) on the prepared baking sheet, leaving small spaces between them. If preferred, use cookie cutters to make different homemade maria mole.
- shapes. Quick Pre-Refrigeration (Optional): homemade maria mole Place the baking sheet with the mounds in the fridge for about 15 minutes to slightly set the surface. This optional step makes rolling in grated coconut easier.
- Rolling in Grated Coconut: Remove the baking sheet from the fridge. Using a small spatula and delicacy, lift each mound of homemade maria mole and roll in the finely grated dried coconut, covering the entire surface. Return the coco-coated mounds to the baking sheet.
- Extended Refrigeration: Take the baking sheet with the homemade maria mole to the refrigerator for at least 3 hours, or ideally 4 hours, to fully set. Refrigeration time may vary slightly depending on the refrigerator and the size of the mounds. The homemade maria mole will be firm when it feels consistent to the touch and holds its shape.
Finishing and Storage: Enjoying and Storing Your Homemade Maria Mole
After refrigeration, your homemade maria mole will be ready to be enjoyed and savored. To preserve the sweet longer, follow proper storage tips.
Serving Homemade Maria Mole: Presentation Tips
- Remove from Refrigerator Shortly Before Serving: Remove the homemade maria mole from the refrigerator about 15 to 20 minutes before serving, to let it become slightly softer and creamier.
- Presentation on a Tray or Decorated Plate: Transfer the mounds of homemade maria mole to a beautiful tray or decorated plate. Garnish with more fresh grated coconut or toasted coconut for a special touch.
- Finishing Variations: Besides white grated coconut, try finishing the homemade maria mole with toasted coconut, sprinkles, chocolate shavings, ground cinnamon, or other toppings of your choice.
Proper Storage: Maintaining Freshness and Flavor
- Storage in an Airtight Container in the Refrigerator: Store the homemade maria mole in an airtight container or well-sealed dish inside the refrigerator for up to 3 days. Keeping it in a closed container prevents the maria mole from drying out and absorbing odors from the fridge.
- Avoid Freezing: Freezing the homemade maria moleis not recommended, as the texture may change after thawing.
Creative Variations and Innovative Flavors of Homemade Maria Mole
Although traditional homemade maria mole is delicious, you can explore creative variations and innovative flavors to surprise and delight even more. Try adding essences, colorings, fruits, or other ingredients to the mixture to create unique and personalized versions of your favorite dessert.
Suggested Variations to Try at Home
- Toasted coconut maria mole: Use toasted grated coconut to roll the homemade maria molemounds. Toasted coconut gives a caramelized flavor and a special touch to the dessert.
- Maria mole with essences: Add a few drops of vanilla, almond, lemon, or other essences of your choice to the meringue with gelatin to flavor the homemade maria mole.
- Colored maria mole: Divide the meringue with gelatin into portions and add gel or liquid food coloring to each portion, creating homemade maria mole colorful and fun treats.
- Maria mole with fruits: Add small pieces of candied fruit, chopped dried fruits, or citrus zest to the meringue with gelatin to incorporate extra flavor and texture to the homemade maria mole.
- Vegan maria mole: Replace egg whites with aquafaba (chickpea cooking water) to prepare a vegan version of homemade maria mole. When whipped, aquafaba forms a meringue similar to egg whites meringue.
Conclusion: Share the Sweetness and Magic of Homemade Maria Mole
A homemade maria mole is more than just a simple dessert. It’s an invitation to recall happy moments, to celebrate simplicity, and to share sweetness with those we love. With this detailed recipe and valuable tips, you hold the secret to making a homemade maria mole perfect, soft, airy, and irresistible maria mole able to delight every palate. Don’t wait, try this recipe and bring the magical and nostalgic flavor of homemade maria mole!
Image Source: receitatodahora