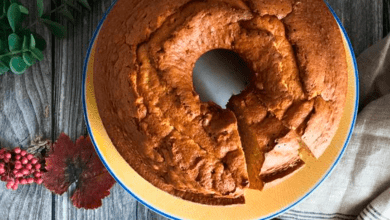

Get ready to be delighted by this Blackberry Blender Cake! A practical, quick recipe that yields a super fluffy cake, with an incredible purplish color and a flavor that will surprise you. Perfect for enjoying the blackberry season or using frozen ones, this cake is ideal for a special snack, a hearty breakfast, or even an eye-catching dessert. Besides being beautiful and delicious, it’s made in the blender, which makes preparation even easier. Shall we discover the secrets of this recipe that will win your heart (and your palate)?
Why Is This Blackberry Cake Unmissable?
This Blackberry Cake is special for several reasons. First, the vibrant and naturally purplish color of the batter, which contrasts with the icing, creating an amazing look. Second, the extremely soft and moist texture, the result of the perfect combination of ingredients and preparation method. Third, the balanced flavor between the sweetness and tartness of the blackberries, complemented by orange zest, which adds an irresistible citrus touch. And lastly, the practicality: a cake made in the blender, hassle-free, ready quickly and leaving you with minimal dishes to wash afterward, making it a super easy cake to prepare. It’s the ideal recipe for those looking for a beautiful, tasty, and uncomplicated cake!
Ingredients: The Secret to a Purple and Flavorful Cake
The ingredient list is simple, but each plays an important role in the final result:
- Blackberry: The star of the recipe! Use fresh, ripe blackberries from your backyard blackberry bush, which are not only tastier but also cheaper. If fresh blackberries aren’t available, the recipe can be made with frozen blackberries, taking care not to thaw them before use. If you can’t find blackberries, you can substitute them with fresh or frozen raspberries, blueberries, or strawberries. Preferably use red and purple fruits.
- Sugar: Regular refined sugar guarantees just the right sweetness. You can also use crystal or demerara sugar if you prefer.
- Oil: Vegetable oil is the fat chosen for this recipe as it helps keep the cake moist and fluffy; it’s best to use a neutral oil like corn or sunflower oil. Butter is not recommended here as it would make the cake heavier, whereas the goal is a light cake.
- Eggs: Eggs provide structure and binding to the batter; they also help give the cake a yellowish color. If possible, prefer free-range or pasture-raised eggs, which have more orange yolks.
- Wheat Flour: Wheat flour is the base of the cake, providing structure and consistency. However, it is possible to make this recipe with gluten-free flour.
- Baking Soda: This is the secret for a fluffy cake! Baking soda reacts with the acidity of the blackberries, creating air bubbles that make the batter light and airy. That’s why it is important not to replace this ingredient with baking powder.
- Salt: A pinch of salt enhances the flavor of the other ingredients and balances the sweetness.
- Orange Zest: Orange zest adds a delicious citrus aroma that complements the blackberry flavor, but you can also use lemon peel zest.
- Powdered Sugar: Used for the icing, which finishes the cake with a sweet and shiny layer.
Preparation: The Magic Happens in the Blender
One of the best parts of this recipe is the practicality. You’ll dirty few dishes and prepare everything in the blender! Follow the step-by-step:
Preparing the Batter:
- Preheat the Oven and Prepare the Pan: Preheat the oven to 180°C (medium temperature). Grease a small rectangular pan (about 20 cm long with high edges) or a loaf pan with oil and dust with wheat flour. You can also use a medium to small round pan with a hole in the center. If you prefer, line the pan with parchment paper to make unmolding easier. Another great option is to use non-stick parchment paper that doesn’t stick to the cake.
- Blend the Blackberries with the Sugar: In the blender jar, place the blackberries (fresh or frozen, without thawing) and sugar. Blend until you get a thick and homogeneous juice. If you’re using large, blackberries, it’s best to sieve to discard the seeds and return the mixture to the blender with the other ingredients. However, if the blackberries are small from the blackberry bush, since they have fewer seeds, this step is not necessary.
- Add the Remaining Ingredients: Add the oil, eggs, and salt to the blender. Blend for a few seconds just to mix. Add the wheat flour and blend for another 1 minute until you obtain a homogeneous batter. You can substitute wheat flour with a gluten-free flour mix in the same amount, just be careful not to overmix the batter to avoid a heavy cake.
- Incorporate the Baking Soda and Orange Zest: Transfer the batter to a bowl or, if there’s space in the blender jar, add the baking soda and orange zest and gently mix with a spatula or spoon until incorporated. Do not overmix, just until the batter is uniform. Ideally, it should be aerated so the cake rises, becomes soft and fluffy, as this recipe doesn’t use baking powder.
- Bake the Cake: Pour the batter into the prepared pan and bake in the preheated oven for about 45 minutes, or until the cake has risen, is golden, and firm to the touch. Perform the toothpick test: insert a toothpick into the center of the cake; if it comes out clean, the cake is ready, but if it comes out with some batter, bake for another 5 minutes. Oven times can vary a bit as each oven performs differently; some bake faster, others a bit slower.
Preparing the Icing and Finishing:
- Prepare the Icing: While the cake is baking, prepare the icing. In a small bowl, place ½ cup of blackberries and mash with a fork; you can also squeeze directly into a sieve. Add the powdered sugar and mix well until you get a smooth, homogeneous paste, but not too thick, with a good consistency for icing. If necessary, add more blackberry juice gradually until the desired consistency is reached. Reserve the remaining blackberry juice for the next step.
- Unmold and Cover: Remove the cake from the oven and wait 5 minutes. Then unmold it onto a serving plate. Brush the entire surface of the cake with some of the mashed blackberry juice you reserved earlier. After that, spread the icing over the still-warm cake and let it cool for at least 2 hours before serving. If the weather is very hot, refrigerate and take it out half an hour before serving. This will help keep the cake moist inside and the sugar crust firm, like a sugary topping. If you don’t like icing, you can skip this step as the blackberry cake is good even plain. If you prefer to serve the cake without the icing topping, it should cool in the pan for at least 30 minutes before unmolding. The blackberry cake without icing keeps well for 3 days at room temperature, and with the icing, this period is reduced to 2 days since the icing starts drying and softening, compromising the cake’s quality and flavor.
Tips for an Even More Amazing Blackberry Cake
- Use Fresh and Ripe Blackberries: If possible, use fresh, ripe blackberries which are sweeter and more flavorful. If using frozen blackberries, do not thaw them before use to avoid releasing too much water and making the batter heavy.
- Don’t Overmix the Batter: Mix the ingredients only until combined. Overmixing can result in a heavy and rubbery cake.
- Vary the Fruits: If you can’t find blackberries, you can substitute with raspberries, blueberries, or even strawberries, with some notes. Raspberry has acidity closest to blackberry and can be used safely, both fresh and frozen. Strawberry has a milder flavor; it’s ideal to combine it with raspberry or black blackberry and use it fresh so it doesn’t alter the cake’s color. Lastly, blueberry has a darker color similar to blackberries and can be used fresh or frozen, but its flavor is quite distinctive; although it pairs well with orange zest, it tastes a bit different from the cake made with blackberries, and blueberries are much less sweet.
- Add a Crunchy Touch: Add 1/4 cup of chopped nuts, walnuts, or sliced almonds to the batter for a more interesting texture.
- Serve with Accompaniments: O Blackberry Cake It’s delicious served with a scoop of cream or vanilla ice cream, homemade whipped cream, a red fruit syrup, or a dollop of natural yogurt. Ideally use accompaniments with a slight acidity to balance the sweetness of the cake.
Recommended Products to Facilitate Preparation
- Philco PLQ2100PI 12 + Turbo 3L 1200W Blender: Perfect for blending blackberries and the other batter ingredients quickly and efficiently, this is the go-to item for blender cake recipes. Get yours! – Power and convenience for your recipes!
- 9-Piece Teflon Cookware Set with Glass Lids and Nonstick Coating: Useful for preparing a red fruit syrup to accompany the cake, if desired; with this nonstick set, the syrup won’t burn or stick to the pan’s bottom. Check out this option! – Versatility and quality in your kitchen!
- 6-Piece Nonstick Knife Set: Essential for chopping fruits and nuts if you choose to add them to the batter. See it here! – Precision and comfort in cutting!
- Mondial Pratica B44R Stand Mixer: Useful for preparing the syrup and icing, and even beating the eggs if you prefer to do this step separately. Get yours! – Power and convenience for your recipes!
Conclusion
O Blackberry Blender Cake is a recipe that combines practicality, beauty, and an unforgettable flavor. With its fluffy batter, vibrant color, and the tangy touch of blackberries, this cake is a true temptation for any time of the day. Whether for a special breakfast, an afternoon snack with friends, or a delicious dessert, this cake will win you over with its simplicity and incredible result. Now that you have all the secrets in hand, how about getting hands-on and preparing this delight today? Don’t forget to visit our blog for more tips and recipes like these!
Image Source: berryhouse