Codfish Before Baking: Do You Need to Cook It? Definitive Guide and Delicious Recipe
Bacalhau Antes de Assar: Precisa Cozinhar? Guia Completo

The intoxicating aroma of roasted cod lingering in the air, the rich flavor and flaky texture melting in your mouth… Who can resist a good cod? This iconic dish, a constant presence on Portuguese and Brazilian tables, is synonymous with celebration and flavor. Whether for Good Friday, Christmas, or a special family lunch, roasted cod elevates any occasion, turning the ordinary into extraordinary.
But when venturing into the preparation of this delicacy, one question remains in many cooks’ minds, from the most experienced to beginners: do you need to cook the cod before roasting it? This is the golden question, the crucial point that can determine the success or failure of your dish. After all, no one wants dry, overly salty cod or one with unpleasant texture.
In this complete and definitive guide, we will unveil all the secrets behind preparing the perfect roasted cod. We will dive into the world of desalting, understand the importance of pre-cooking, explore valuable techniques and tips to ensure an impeccable result, and, as a bonus, gift you a delicious and practical recipe to put everything you learn into practice. Get ready to become an expert in roasted cod and surprise everyone with your culinary skills!
The Essential Art of Desalting Cod: The First Step to Success
Before even thinking about cooking or roasting the cod, desalting emerges as a fundamental and unavoidable step. Cod, traditionally sold salted and dried, undergoes an ancient preservation process that, while ensuring its longevity, demands careful preparation before consumption.
Desalting isn’t just about removing excess salt; it’s a process that rehydrates the fish fibers, restoring its original texture and enhancing its natural flavor. Well-desalted cod is the chef’s blank canvas, ready to absorb the flavors and aromas of spices and other ingredients in the recipe.
Why is Desalting Cod Crucial?
- Health First: Excess salt is harmful to health, contributing to high blood pressure and other cardiovascular problems. Desalting cod significantly reduces sodium intake, making the dish healthier for you and your family.
- Balanced and Refined Flavor: Excess salt masks the delicate, characteristic flavor of cod. Proper desalting allows the fish’s natural flavors to shine, perfectly harmonizing with the other ingredients in the recipe.
- Soft and Pleasant Texture: The desalting process rehydrates the cod’s fibers, restoring moisture and ensuring a soft, flaky, and juicy texture. Poorly desalted cod can become tough, rubbery, and unpleasant to the palate.
Essential Techniques and Tips to Perfectly Desalt Cod
- Cut the Steaks (Optional, but Recommended for Large Pieces): If your cod is a large whole piece, consider cutting it into smaller steaks. This facilitates desalting, as water penetrates the fish fibers more easily and ensures more even salt removal.
- Rinse the Cod Under Running Water: Before starting the actual desalting, quickly rinse the cod under cold running water. This simple step helps remove surface salt and any impurities.
- Soaking in Cold Water: The Secret to Effective Desalting: In a large, clean container, place the cod steaks and fully cover them with cold water. Make sure all parts of the fish are submerged. The amount of water should be generous to effectively dilute the salt.
- Continuous Refrigeration: The Refrigerator as an Ally: Put the container with cod and water in the refrigerator. The low temperature slows bacterial growth and contributes to a safer and more controlled desalting process.
- Strategic Water Changes: The Key to Ideal Desalting: Every 6-8 hours, change the water for the cod. Discard the salty water and replace it with clean cold water. The frequency of water changes varies depending on the thickness and size of the steaks, as well as your personal preference for final saltiness.
- Desalting Time: Patience is Essential: The desalting time can vary between 24 and 48 hours, or even longer, depending on the thickness of the cod and the desired salt level. Thicker steaks and saltier cod will require more time to desalinate.
- The Taste Test: Ensuring Perfect Desalting: After the initial desalting period, remove a small piece of cod and quickly cook it in boiling water. Taste it! If it’s still too salty, return the cod to cold water for a few more hours, repeating the water changes and taste test until it reaches your ideal salt level.
- Shredded Cod: Easier and Faster Desalting: If you plan to shred the cod for your recipe, you can desalinate it already shredded or in smaller flakes. This speeds up the process because more surface area contacts the water. The desalting time for shredded cod can be significantly shorter, around 12 to 24 hours, with regular water changes.
- The Milk Trick (Optional): Some recipes and chefs recommend using milk in one of the water changes. It’s believed that milk helps soften the cod’s fibers and refine its flavor. However, cold water alone is sufficient for an effective and traditional desalting.
Pre-Cooking Cod Before Roasting: Yes or No? The Surprising Answer!
And now, the crucial question that brought us here: do you need to cook the cod before roasting it? The answer, which might surprise some, is: yes, it is generally recommended to pre-cook cod before roasting, especially if you seek perfect results in texture and flavor.
Although some recipes omit pre-cooking, the traditional and safest method to ensure juicy, tender, perfectly cooked roasted cod involves a pre-cooking step.
Irrefutable Reasons to Pre-Cook Cod Before Roasting
- Perfect Texture: Guaranteed Tenderness and Juiciness: Pre-cooking ensures the cod reaches the ideal cooking point before going into the oven. Roasting pre-cooked cod helps retain its natural moisture, resulting in a soft, flaky, and juicy texture without drying out in the oven.
- Even and Controlled Cooking: Pre-cooking gives you greater control over the cod’s doneness. This is especially important in recipes with other ingredients requiring longer oven time, like potatoes, onions, and peppers. Pre-cooking prevents the cod from drying out or overcooking while other ingredients roast.
- Enhanced Flavor Integration: Pre-cooking allows the cod to better absorb the flavors of spices used in the cooking water, such as bay leaves, peppercorns, and aromatic herbs. This step adds extra layers of flavor to the final dish.
- Reduced Oven Time: Convenience and Speed: With pre-cooked cod, oven time is considerably shorter, focusing only on browning and finishing the dish. This is especially advantageous in more elaborate recipes with multiple ingredients in the oven.
How to Pre-Cook Cod Correctly: Simplified Step-by-Step
- Aromatic Boiling Water: The Secret to Flavor: In a large pot, bring water to a boil. Add salt (remember the cod has already been desalted, so use little salt), bay leaves, black peppercorns, and other aromatic herbs if you like (optional).
- Gentle Immersion: Cook with Care and Attention: Once the water is boiling, gently add the cod steaks. Lower the heat to medium-low, keeping the water at a gentle simmer. Cooking should be delicate to preserve the fish’s texture.
- Cooking Time: Pay Attention to Thickness: Cooking time varies depending on steak thickness. Thinner pieces cook faster. Generally, cooking takes between 5 and 10 minutes. Cod is pre-cooked when tender to the touch but still firm and not falling apart.
- Ideal Point: Tender Inside, Firm Outside: Remove the cod from the water with a slotted spoon once it’s pre-cooked. Drain well and set aside. Do not overcook at this stage, as the cod will still go into the oven to finish.
- Cooking Water: A Flavorful Broth for Other Uses: Do not discard the cod cooking water! Strain and keep it. This flavorful broth can be used to prepare rice, soups, or other dishes, adding a special touch and making the most of the cod’s flavors.
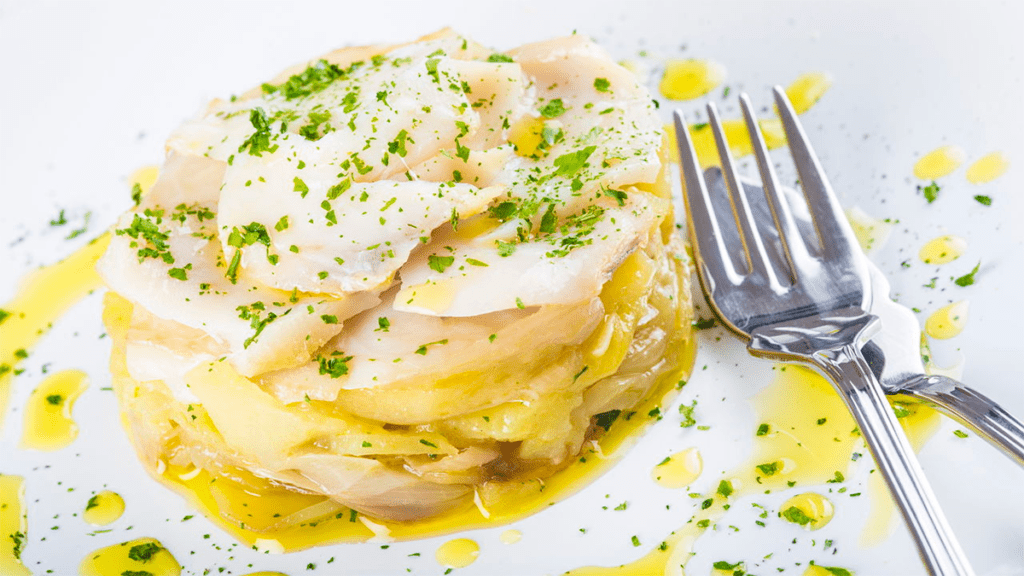
Delicious Roasted Cod Oven Recipe: Flavor and Simplicity Combined
Now that you’ve mastered the art of desalting and pre-cooking cod, it’s time to put all your knowledge into practice and prepare an irresistible recipe of oven-roasted cod. This classic and versatile recipe is perfect for any occasion, from a family lunch to a more sophisticated dinner. Follow the step-by-step and get ready to receive compliments!
Fresh, Quality Ingredients for Unforgettable Roasted Cod
- 500g of Desalted and Pre-Cooked Cod: Choose good quality cod, already desalted and pre-cooked as per the previous tips. Shred into large flakes or keep in steaks, depending on your preference.
- 1 kg of Potatoes: Medium potatoes, peeled and sliced thinly or cut into small cubes (light pre-cooking to speed up oven cooking is optional but recommended for thicker slices).
- 2 Large Onions: Onions sliced thinly or into petals.
- 3 Garlic Cloves: Garlic finely chopped or sliced.
- Extra Virgin Olive Oil: Good quality olive oil, essential for flavor and moisture of the dish.
- Salt and Black Pepper to Taste: Adjust salt carefully, remembering the cod already has a salty touch even after desalting. Freshly ground black pepper for a special touch.
- Chopped Fresh Parsley: To garnish and add a fresh touch at the end (optional).
- Black Olives (Optional): Black olives to decorate and add a salty, Mediterranean touch (optional).
- Boiled Eggs (Optional): Boiled eggs sliced for decoration and to enrich the dish (optional).
Detailed Preparation Method: Transforming Simple Ingredients into a Sophisticated Dish
- Preheat the Oven and Prepare the Ingredients: Preheat the oven to 200°C. While the oven heats up, prepare the ingredients: peel and cut the potatoes and onions, chop the garlic, and set aside the pre-cooked codfish.
- Sauté the Onion and Garlic (Optional, but Adds Flavor): In a skillet, heat some olive oil and sauté the onions until soft and translucent. Add the chopped garlic and sauté for a few more seconds, just to release the aroma. This optional sauté intensifies the dish’s flavor but can be omitted for a quicker version.
- Layering: Beauty and Flavor in Harmony: In a large baking dish greased with olive oil, spread a layer of potatoes at the bottom. If you choose to pre-cook the potatoes, this is when to use them. On top, arrange the sautéed onion slices (or raw if you decide not to sauté).
- The Codfish as the Star: Strategic Distribution: Spread the pre-cooked codfish flakes evenly over the layers of onions and potatoes.
- Finish the Layers and Drizzle Generously with Olive Oil: Cover the codfish with another layer of potatoes and finish with the remaining sautéed (or raw) onions. Drizzle generously with extra virgin olive oil over all the ingredients. Don’t hold back on the oil; it is essential for moisture and flavor.
- Season Moderately: Salt and Pepper to Taste: Season with salt and black pepper to taste. Remember to use salt cautiously, as the codfish already has a natural salty touch.
- Place in the Oven and Bake Patiently: Place the baking dish in the preheated oven and bake for approximately 20-30 minutes, or until the potatoes are tender and golden and the codfish is heated through and lightly gratinated. Baking times may vary depending on your oven and the thickness of the ingredients.
- Final Touch: Decoration and Fresh Flavor: Remove the baked codfish from the oven and garnish with chopped fresh parsley, black olives, and boiled egg slices (optional). These elements add color, flavor, and a sophisticated touch to the dish.
- Serve Hot and Enjoy Every Bite: Serve the baked codfish hot, accompanied by a fresh green salad, white rice, or other sides of your choice. Enjoy every bite of this comforting and flavorful delight!
Extra Tips and Chef Tricks for Perfect Baked Codfish
- Vary the Ingredients: Create Unique Flavors: Explore your creativity and add other vegetables to the recipe, such as colorful bell pepper strips, cherry tomatoes, or pre-cooked broccoli or cauliflower. Each ingredient adds new dimensions of flavor and texture to the dish.
- Fresh Aromatic Herbs: A Touch of Freshness and Elegance: Besides parsley, use other fresh chopped herbs to season and garnish, such as basil, oregano, thyme, or rosemary. Fresh herbs elevate the aroma and taste of the baked codfish, adding a touch of freshness and elegance.
- Dry White Wine: A Flavorful Deglazer (Optional): Before placing in the oven, drizzle the baked codfish with a splash of dry white wine. The wine evaporates during cooking, leaving a subtle and complex flavor in the dish.
- Fresh and Crunchy Bread: The Unbeatable Side: Serve the baked codfish with fresh, crunchy bread to accompany and absorb all the flavor of the olive oil and sauce. Italian bread, French bread, or Alentejo bread are great options.
- Attention to Cooking Point: Don’t Dry Out the Codfish: Keep an eye on the codfish during baking. If you notice it browning too quickly, cover the baking dish with aluminum foil to prevent it from drying out. The codfish is ready when the potatoes are tender and golden and the fish is heated and juicy.
Final Conclusion: Perfect Baked Codfish Within Your Reach!
We’ve reached the end of this culinary journey, and now you’re an expert in baked codfish! We demystified the pre-cooking process, explored the secrets of perfect desalting, and shared a delicious and practical recipe for you to impress everyone.
Remember: the secret to perfect baked codfish lies in the combination of fresh, quality ingredients, careful desalting, the pre-cooking step that ensures ideal texture, and the generous touch of olive oil that unites all the flavors in harmony.
Now it’s your turn! Put into practice everything you’ve learned, invite your family and friends to enjoy this delight, and savor unforgettable moments at the table. Baked codfish is more than a dish; it’s a tradition, a symbol of affection, and an invitation to celebration.
Share your experiences and tips in the comments, and keep exploring the fascinating world of cooking. Cooking is an art that improves with practice and the exchange of knowledge. And remember: a baked codfish prepared with care and dedication has the power to turn any meal into a special moment!
Until the next gastronomic adventure!
Image Source: receitasdepesos